Resource Center
Documentation center for Safety 360 Elite Modules, Downloads & Assets.
Legal Register & Risk Assessments Module Resources
V3.3 Guide
Introduction
This information guide will assist the user with creating, managing/editing and using the Legal Registers and Risk Assessment features on Safety 360 Elite.
Safety 360 Elite is aligned to ISO31000
To create and use a Legal Register and Risk Assessment on the system the following must be in place:
- Employees created on system with user access granted.
- User has the Risk Assessor hse role assigned.
Only users with the role of Risk Assessor can create/manage/edit Risk Assessments.
The Risk Assessment process on Safety 360 Elite comprises of the following steps:
Legal Register
On the left navigation pane of Safety 360 Elite, click the Legal Register icon. This will take the user to the main Legal Register page shown below, you have 2 cards to choose from.
Clicking on the Legal Register card will take the user to the main Legal Register page shown below.
The Legal Register makes reference to the following legislation:
Legal Compliance Audit
There is also a Legal Compliance Audit template available for use in the Checklist Library. This audit covers the OHS Act and its Regulations and includes all requirements

To find it: Navigate to Checklist -> New Checklist -> Copy from a Template -> Search “Legal”. Audit can be customized by control user. Select Use Template.
Manage Legal Register
Managing the Legal Register to comply with your company legal requirements select the “Legal Register” card.
Select the card to open Legal register page.

Use the sliders to select the applicable legislation for your business. Lets look at OHS act. Select the line item to open the act.

The Legal Register forms the basis of Risk Management in Safety 360 Elite. Here the user would select the relative legal legislation that applies to their company as well as the Responsible Participants, Landlords if needed, Applicable Region’s, and most importantly Controls Implemented.


These Controls will be used in the Risk Assessment process to quickly pull in required items when adding Legal Reference to your Risk Assessment.
Once the user has entered all info, click Add to log legislation and info as Applicable to your organisation
Legal Register Controls
Hierarchy of Controls on Safety 360 Elite Risk Management.
Legal Register PDF
Once the Legal Register has been completed, the legislation selected as Applicable will become available to select as Legal Reference when creating a new risk assessment item.
The completed Legal Register can also be exported to PDF.
Risk Assessment
On the left navigation pane of Safety 360 Elite, click the Risk Assessment icon . This will take the user to the main Risk Assessment page shown below.
On the Main Risk Assessment page we can find the following Cards:
By clicking the New Risk Assessment card, users will be taken to the main creation page.
New Risk Assessment
By clicking the New Risk Assessment card, users will be taken to the main creation page. Information added here can be updated at a later stage.
RA Methodologies
Safety 360 Elite has 3 base methodology options to choose from. These can be used as is, or customized through the Account Settings on main system page.
RA Recommended Actions
Recommended Actions follow the below:
Once all details are completed, the Create Risk Assessment becomes available. This will Automatically open the Ris Assessment builder
Risk Assessment Types
There are three types of Risk Assessments: Baseline, Project & Daily.
Baseline
This is your PRIMARY risk assessment. This will form as risk library. Users will be able to make copies of these when creating Project/Daily risk assessments.
Project
These can be Project specific risk assessments, copies of a baseline or brand new.
Daily
This is your daily continuous risk assessment. Users can pick tasks from main baseline.
Building Risk Assessment
Once the user has completed the set-up phase, the risk assessment is stored and can be found under the main Risk Assessment card.

You can find your new RA on the main page, it will be stored under Risk Assessment or the quick link under “Your Created Risk Assessments”.
Once you open your Risk Assessment you will find the main details relating to your RA.
Selecting the “Edit” button will open the “Add Tasks” to the RA page.
RA Dashboard Summary
VIEW → This will show you the risk assessment in its current form, how the pdf will display.
EDIT → This will take the user to the risk builder
SUBMIT → This will send the risk assessment for review, all collaborators with review role set
REVIEW → Collaborators with review role can click review to open the VIEW but with approve/reject ability
DRAFT → This will send the risk assessment back to draft for editing/updating. Will need to go through review again
ARCHIVE → This will archive the risk assessment. Can be returned through Archive List
VERSIONS→ Will show any pdf’s, current and past of the risk assessment
SWP → Build safe working procedures linked to Tasks/Hazards/Risks from risk assessment
Building Risk Assessment
Adding a new Task (Event).
Here users will start the Hazard Identification and Risk Assessment process by adding the Task (Event) up for investigation.
Once added, the task will have a line item which can be expanded by clicking on it.
From here the user can either add the rest of the tasks and then add the next layer, or go directly into the task and start Identifying hazards for the task. You can also use the Import Task to add more task from your existing RA or use the Import from Library to build more task. Select the line item to expand the task and start adding Hazard.
Once added, the task will have a line item which can be expanded by clicking on it.
The User/RA building the RA can now click on the plus to add the Hazards, this will also open the scoring for the new Hazard.
Once that Task line item is expanded it will show the New Hazards/Risk score table as seen below.
After adding the Hazard description along with rating selection, the Hazard will be listed with its raw risk score.
Raw Risk → Add Mitigations and Controls → Update input based on effectiveness of Controls → Residual Risk
Once done, repeat for all hazards.
Once you have identified your Risks and listed your Controls, you can add your Residual Risk. This is the updated score after considering your controls. Remember that ratings will always be A if the worst outcome is possible.
Once you have added all your Tasks, added all your residual Risks, Mitigations and Controls, and you are satisfied with your RA you can select Done.
RA Dashboard
The Risk Assessment Dashboard is where users can submit/review risk assessments, add collaborators view current and previous versions as well as create Safe Working Procedures (SWP).
History Log will show movement in status between Drafting → Approved/Rejected.
Risk Assessment Details
This displays all the risk assessment information including Name, Methodology, version and Applicability.
Collaborators and Reviewers
By default the creator is the only person able to edit a risk assessment. They can add members under the Collaborators tab shown below. Collaborators can have Edit, Review or Both roles assigned. If a Collaborator has the Review permission, their name will move under Reviewers heading.
RA Non Conformances
All new risks create Non Conformances in Safety 360 Elite. This allows the tracking, monitoring and closure through the Non Conformance tool. If you are building a baseline and would like to bulk close out Non Conformances, click the arrow Icon as shown below.
Safe Working Procedures (SWP)
For creating Safe Working Procedures (SWP’s) on Safety 360 Elite, the user has 2 options:
Option 1
Through Baseline Assessment
This will create SWP’s linked to specific Tasks (Events) in your open Risk Assessment.
To do this head to your risk assessment, on the dashboard click Safe Working Procedures as show below.

Option 2
Freestanding SWP
Here the user will type out the Task (Event) and risk details as there is no link to risk assessment.
These can be found on the main risk page under the Safe Working Procedures tab show below.

SWP – Through Assessment
On the Risk Assessment Dashboard, click the icon on right that says SWP’s.
SWP – Setup
The first page of the SWP Builder will allow the user to add Title, Document Number and Description information. The user also needs to select an SWP Approver, this is the user responsible for Approving the SWP
Similar to the Risk Assessment Dashboard, the SWP Dashboard seen below works in the same way:
Build/Edit -> Submit/Review -> Use Approved
The Edit SWP Dashboard seen below, helps you add content to your SWP.
SWP Details
This displays all the SWP information including Title, Description, Document Number and Approver.
Review SWP Details
The reviewer will receive an email as below, once the reviewer click the Review SWP, it will take the reviewer to the Review SWP page, to add comments. The SWP will then be Approved or Declined
SWP Dashboard
The SWP Dashboard is where users can view/edit/submit/review safe working procedures.
Once changes have been made it must go through Review/Approve phase to confirm changes.
History Log will show movement in status between Drafting Approved/Rejected.
SWP – Freestanding
On the Risk Assessment Dashboard, click the Safe working procedure card, shown below
Users can view all SWP regardless of where they where created (Assessment or Freestanding), both will show here. Users can search for SWP with text or filter by Status: All approved SWP will be listed below.
+ New SWP takes the user to the builder page, where they can input: Title, Document Number, and Description information. The user also needs to select an SWP Approver, who is the responsible user for “Approving” the SWP.
SWP - Edit
On the SWP Dashboard for both Assessment based and Freestanding SWP’s, users will find the Edit icon shown below.
NOTE: This option will only be available in SWPs that are in Drafting status, approved SWPs need to be reverted to Draft first.
The Content Builder page will allow users to add content to SWP under the headings shown below.
The Task and Hazards heading will come populated with information if the SWP is assessment based. Users can still add additional information manually
Once all the content has been added the user can move the Revision phase to get the SWP Approved.
SWP – Review
Add a comment to Approve or Decline the SWP.
SWP - Approved SWPs
Once a SWP is approved the user will have access to the PDF document on the main SWP Dashboard.
SWP – QR Code
By clicking the QR Code icon on the SWP Dashboard, the user will be shown the QR Code unique to specific SWP as well as a URL link.
The QR Code can be printed and displayed at high risk areas to ensure employees have quick access to SWP.
Planned Task Observations (PTO)
Planned Task Observations (PTOs) can be conducted on approved SWP’s by clicking the Observation Eye icon (next to the QR code) shown below, and then clicking YES. This will only be available for Approved SWPs.

The PTO process starts by selecting the Observer (user doing the check) and Observee (employee being checked)
The Observer is a default set user that is conducting the PTO, Observee list will show all employees.

Once Participants have been selected, PTO information will become available.
This will show all the information added in SWP under headings.
Here the Observer will be able to confirm whether the Observee is adhering to the SWP and whether the SWP, ands it requirements, are still valid.
The options for each entry are:
- Complying
- Not Complying
- Not Complying – Change Requested
- Not Applicable

Each Observation can be made using:
Complying →Everything is as it should be
Not Complying →This indicates a problem, the system will generate a NCR
Not Complying Change Required →This logs a change request for Risk Assessor to take action
NA →Excludes specific item from observation
Comments can be optionally added to all selection, but are required for Not Complying items. It is important to remember to Confirm each observation.

Each Observation can be made using the selectable: Once your selection is made, confirm your observation.

You will be able to Reset your selection and return to observation. Once all selections was made finalise your selection by confirming observation.

Once all required information has been added, the signature options will be available.
The signature of Observee: These can be any employee so no saved signature option will be available, this person would need to sign on the Observers device.
Signature of Observer: System users have signature linked to username/password, can use saved signature to sign the Observation.
There will be green ticks next to Observer and Observee names once all signatures are in place.
This will also allow the PTO to be confirmed and completed
Completed PTOs can be found on the main Risk Assessment page
Completed PTO’s
All completed PTOs will appear on this register and users can use the filters to find specific entries.
Users can filter Search by: Observer, Observee, and SWP.
Risk Reporting
Under the Left Navigation Pane you will find Reports. Clicking the icon will open the Reports page if the user has the correct hse role (Reports Controller).
If this role is not assigned, the user will not be able to use reports. The report tabs are colour coded for ease of use.

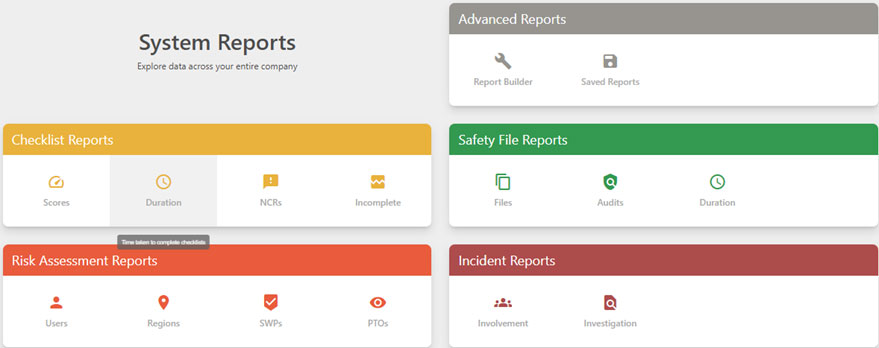
There are currently 4 types of Risk Reports available on Safety 360 Elite:
- User : Reports on Risk Assessments by user
- Regions : Reports on Risk Assessments by region
- SWP’s : Reports on SWPs with number of Observations
- PTO’s : Reports on PTOs with number of Observations
These reports also include all the normal Reports filters that can be applied as needed:

Risk Registers
Safety 360 Elite Risk Management also includes Risk Registers. These are Registers showing you all the information captured during your Risk Assessment and Hazard Identification process.
On the main Risk Assessment page you will find Registers as the last card. Inside you will find the following:
This will give the user access to Hazard Register, Controls Register and Change Requests Registers
Hazard Register → This will show a register of all your identified Hazards (Risk Sources) below the table
Controls Register → This will show all Planned/Existing Control measures below the table
Change Request → This will show a list of changes made below the table.
The Change Requests Register is where Control Users with Risk Assessor HSE role can view all changes requested when doing Planned Task Observations
Clicking on a line item will open the Request page where the user can view current SWP as well as the requested changes.
They can approve/decline the request with a reason.
Rules To Remember
Safety 360 Elite Risk Assessment is aligned to ISO31000
To create and use a Legal Register and Risk Assessment on the system the following must be in place:
- Employees created on system with user access granted.
- User has the Risk Assessor HSE role assigned.
Only users with the role of Risk Assessor can create/manage/edit Risk Assessments.
The Risk Assessment process on Safety 360 Elite comprises of the following steps:
1.Populate Legal Register
2.Create and approve Baseline Risk Assessment
3.Create and approve SWP’s and PTO’s
4.Manage Risk NCR’s
5.Create Project or Daily Risk Assessments by copying from Baseline
6.Risk Reporting
7.Risk Management and Registers
Conclusion
Risk Assessment aims to assist system users with identifying, mitigating and managing risks digitally.


