The Safety 360 Elite App allows you to conduct inspections offline for up to 7 days. Remember to upload your completed checklists regularly for online use.
The following 1-2-3 will guide users in downloading available* checklists to be actioned.
Once a checklist is downloaded and under the ACTION NEW CHECKLIST tab, it can be actioned as many times as required.
*Only checklists created on Safety 360 Elite Live system which are in approved state and linked to User/Region will be available for action.

Checklists
After downloading system data you will have access to the FEATURES. From the dashboard, click CHECKLISTS.

Download
On the checklist Menu, click the DOWNLOAD tab you’ll find (approved) checklists, click the dot to download your selection.

Checklist Types
Swipe left on the checklist type categories to access checklist types not on display.
When downloaded to your device, the dot will turn green.
Once your checklists are marked as available and under the ACTION NEW CHECKLIST box you can action them even in an offline state

Action Checklist
Action/ conduct inspections by accessing your downloaded checklists on the ACTION NEW CHECKLIST tab.

Downloaded
Here you will see all the checklists you downloaded that are ready to use, online or offline. To start actioning a checklist, click the Play Icon
Remove Downloaded
You can also remove downloaded checklists by clicing REMOVE ALL, or by going inside a checklist (through PLAY ICON) and clicking REMOVE.
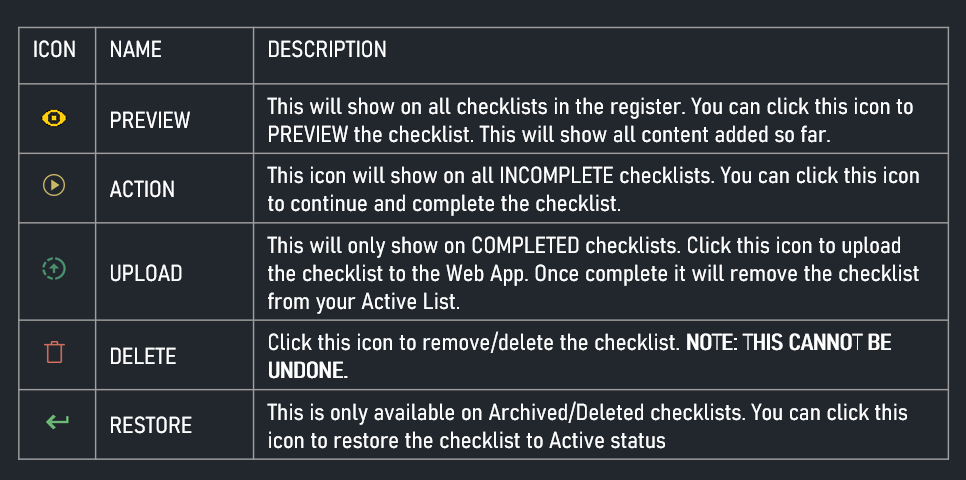
This will explain the various types of icons you might see in the Active Checklist Register.

View Uploaded
This card will show all signed off and completed checklists that have been uploaded to the Live system.

Uploaded Checklists
This register will show the Checklist name, Unique ID as well as Date and Time the checklist was completed.
Click the eye to Preview, or the trash can to delete the checklist.
You can also click REMOVE ALL to clear this register.

View History
Here you will find a History log of all Checklists

History
The History tab will show all checklist activity for the relevant user. There are 4 possible entries on this list
1.Actioned – checklist started
2.Signed off – checklist completed including signature
3.Uploaded – checklist succesfully uploaded to Live system
4.Deleted – checklist has been removed by the user
Click CLEAR HISTORY to remove all entries on this Register

View Archived
This tab will show all Archived/Deleted checklists.

Archived History
This register will show the checklist that was archived as well as the date and time it was actioned.
You can click the BIN icon to permanently delete checklist
Alternatively you can click the GREEN ARROW icon to restore the chekclist to Active state
Clicking DELETE ALL ARCHIVED CHECKLISTS will clear this register and permanently delete all entries on the list. THIS CANNOT BE UNDONE.

Action a Checklist
The following will guide users in Actioning (completing) a checklist listed under ‘ACTION NEW CHECKLIST’.

Action New
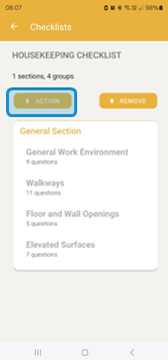
Under the Ready To Use tab find the relevant checklist and click the Play Icon.
Details
Here a user can view the checklist content including number of groups and questions. Once ready click ACTION.

OPS/Area
Swipe the slider for the relevant Operation / Inspection Area based on current Region. Click “set selected area” to confirm
Here the user will see all the Sections, Groups and Questions mentioned in Details on previous slide.
Users can either answer the group or mark it is Not Applicable.
Top Bar Info
Here users can Sign the checklist once completed as well as Save and Exit. The Sign icon will only be available once all checklist questions have been answered or marked as not applicable.
Save will close the checklist and move it to ACTIVE CHECKLISTS.

From there Checklist can be completed by clicking Play Icon.

Answer Group
If a user has selected Answer Group, they will be taken to Group page with Questions.
Selections and Input
Answer selections based on Live system settings. Can be either:
1.Go / No-Go / NA
2.Compliant / Non Complaint / NA
3.In Place / Not In Place / NA
Comments can be entered for all selections but is MANDATORY for No-Go / Non Compliant / Not In Place selections.
Users can also add images (3 per question) with a comment to the checklist.
*This will require Camera and Storage permission.
Adding images to your checklist can be done by either Taking a New Image or Selecting an Image from Gallery.
NOTE: Taking a new image will store the image to your device’s gallery to make sure you do not lose any data.
NOTE: Checklists can be built with question rules including NEW APP PHOTOS ONLY. This rule removes ability to upload from Gallery.

Images Register
This will show all loaded images. To load a new image, click ADD ANSWER PHOTO.

Select Type of Image
Now you can choose to SELECT IMAGE (from gallery) or TAKE A NEW IMAGE.

Selections and Input
After taking a NEW IMAGE you can rotate or crop the image. Clicking CROP will save the image to register.
Once all questions have been answered or marked as NA, and the checklist has been signed off, it can be uploaded to the Live system.
NOTE that this requires a valid connection to the internet. All checklists must currently be manually uploaded to ensure compliance.
In Progress Tab
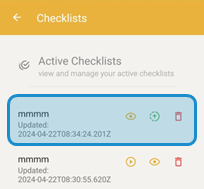
The ACTIVE CHECKLIST page will show completed and signed off checklists ready for upload.
The user can tell if a checklist is ready when the green upload icon is lit and available.
The example below shows 2x test checklist, one is ready the other is not.
Starting Upload
Once the user click the green upload icon they will be taken to Upload page where they can choose Type of upload.

If the upload fails, it will remain under the IN PROGRESS tab and the user can try again once their connection is verified or use partial upload to send to Web App.
Succesfull Upload
A success message will be shown for succesfull uploads and the checklist will be removed from the ACTIVE TAB.

Succesfully uploaded checklists can be found under the VIEW UPLOADED CHECKLIST tab along with their details (time and checklist ID for troubleshooting).