This information guide will assist the user with creating, managing/editing and using Safety 360 Elite Safety File Process.
To create and use a Safety File on the system the following must be in place:
Employees created on system and all Employee Documents loaded to their profiles
All company Documents including Policies, Procedures, Plans etc have been loaded to Safety 360 Elite File Manager
* If you will be sharing files with people outside your organisation, make sure you have your Connected company’s set-up
Only users with the role of Safety File Controller can be added to Safety File.
Only users with role of Contractor Manager can receive files.
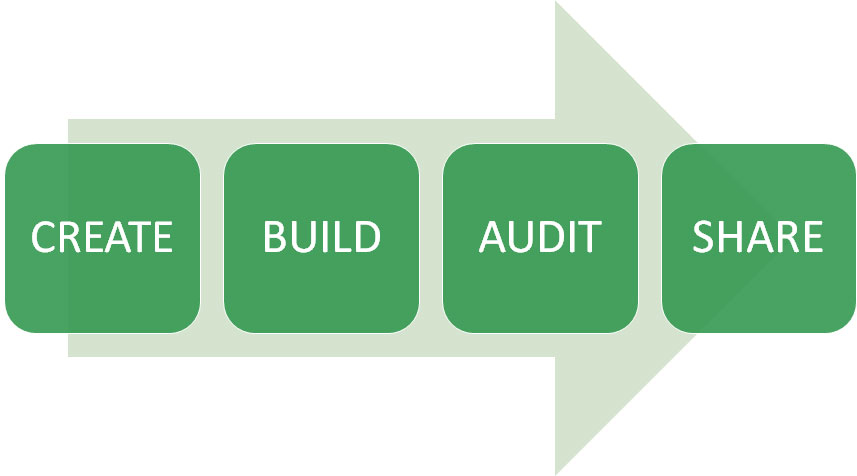
We will look at:
Create File
Build File
Self Audit
Share Internally & Externally
Reports
Safety Files
Each Safety File will go through the following stages
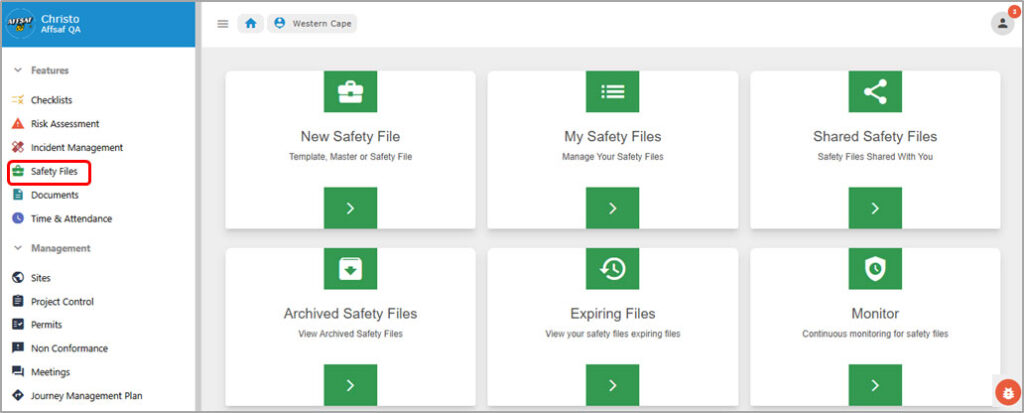
On the left navigation pane of Safety360 Elite you will find the Safety Files tab. Click the icon to navigate to the main Safety Files dashboard. This is also where you find existing Safety Files once created.
You can log a ticket for a suggestion or bug by selecting this bug report button in the bottom right corner.
Main Dashboard
On the Main Safety File Page you will find the following Cards:
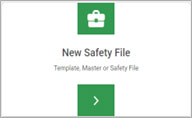
Here you can build a Master / Safety / Contractor file. This is the creation portal.
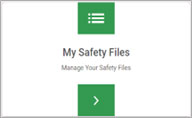
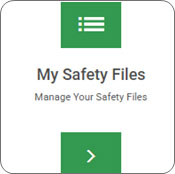
Here you can manage existing Master / Safety / Contractor files. This is the population portal.
Files that have been shared with you from other Safety 360 Elite systems
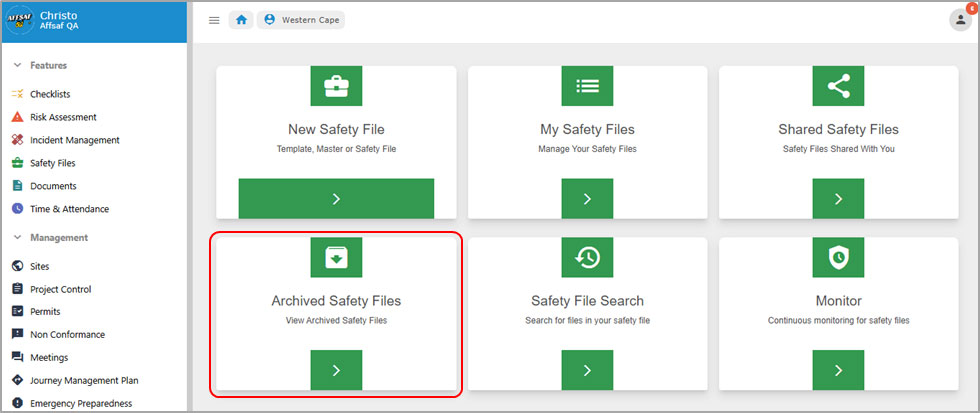
Files that have been Archived. Can be returned by Control User
Here you can manage expiring files inside Safety Files. This register will search through all Files and show document and file expiry
This card will allow the user to monitor the safety file. It ensures that your safety file stays relevant and up to date
New Safety File
This information guide will assist the user with creating a Master, Safety or Contractor file on your system
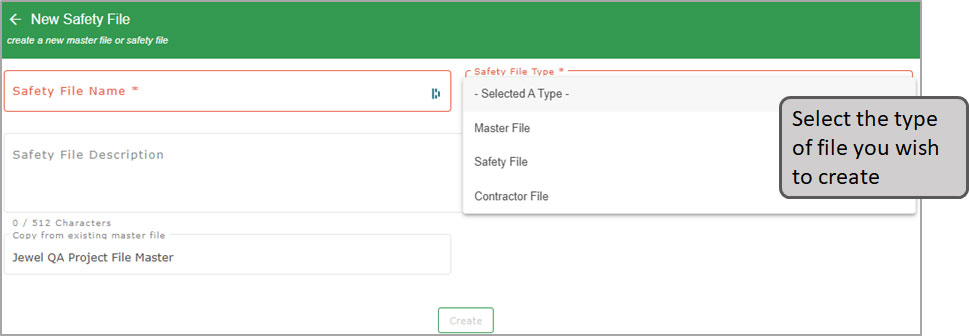
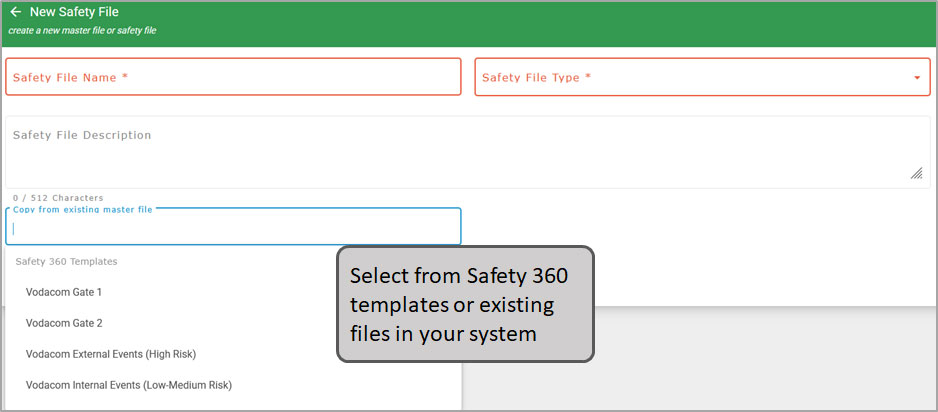
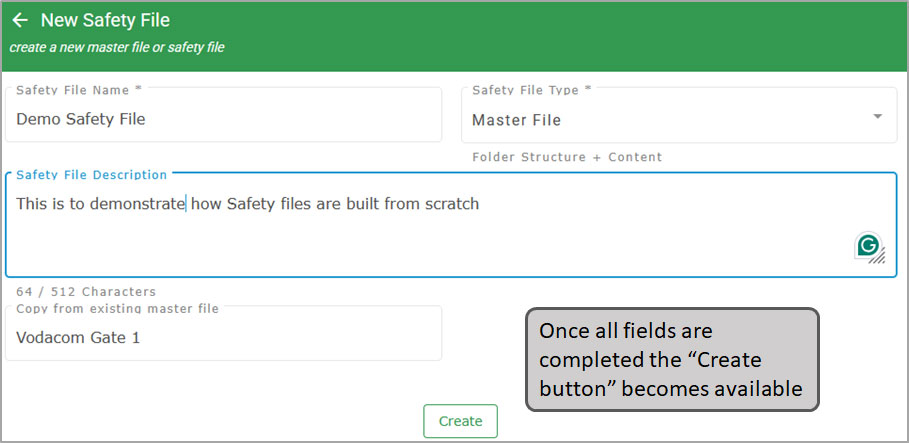
When clicking on “New Safety File” you will be taken to the creation page. Here you will need to add the:
Safety File name – This is the unique name used to identify the safety file
Safety File Type – There are 3 types of Files to build, choose one here (see next page)
Safety File description – Optional description for File
Copy from Master – This allows copies to be made of Master Files
Selecting a file type from the dropdown.
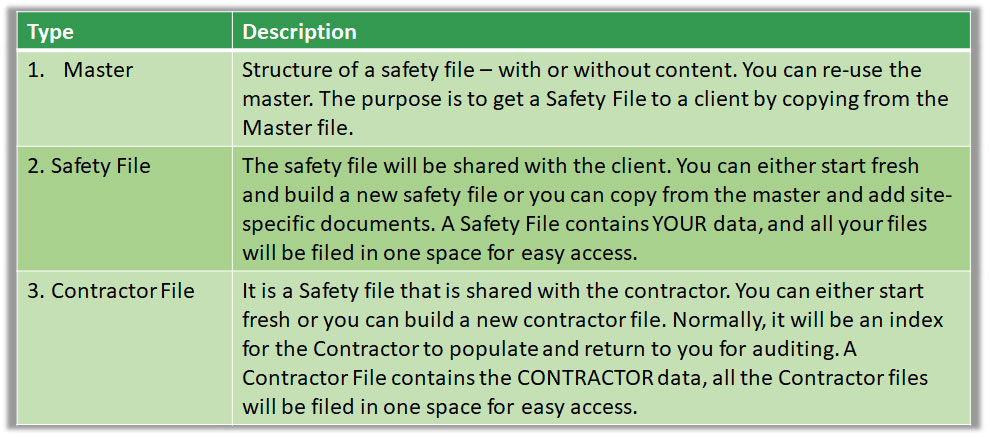
The following table explains the different types of Safety Files:
You can copy from Safety 360 Templates or from your existing files.
You can copy from Safety 360 Library or from your existing Master file.
Once you select the “Create” your safety file will pop up in the selected file type folder.
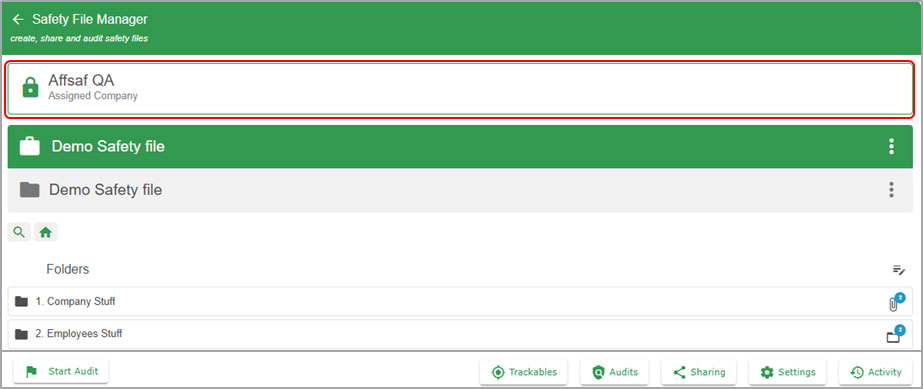
Safety File – Assigned To
The first thing to note is the “Assigned to:” bar shown. All types of Files on Safety 360 Elite have, check-out mechanism to assign to the entity, It allows the entity to work on the File. Only 1 Entity at a time to ensure data validity. If not assigned to an entity more than one can work on the file.
Safety File – Main File Bar
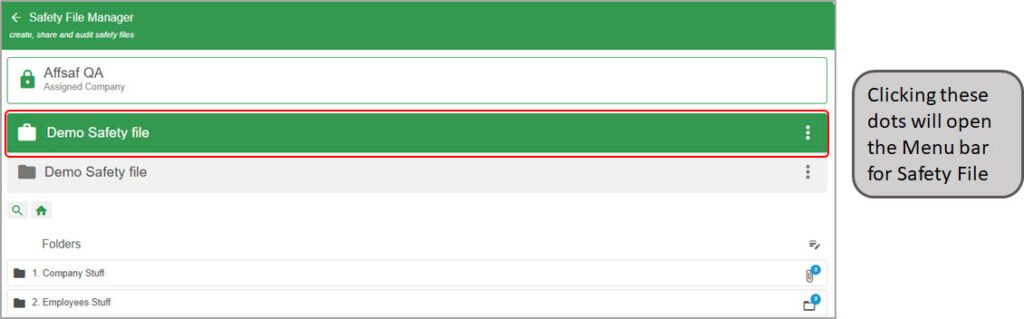
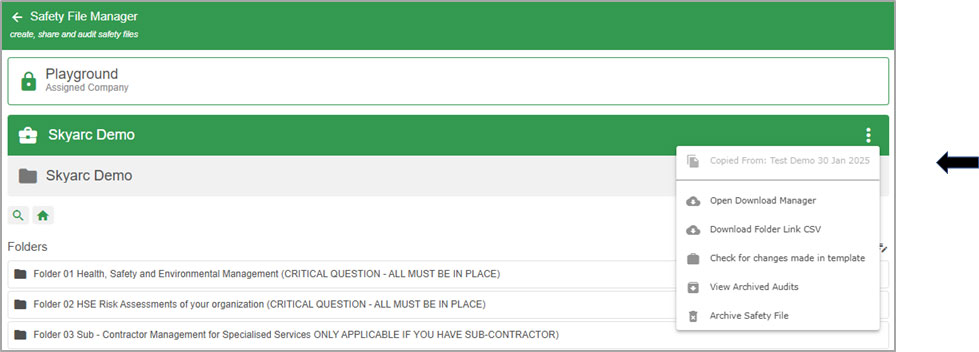
The next option is the GREEN Bar with the Safety File name as shown below. This is the Main File Management Bar.
You can access the Main File Bar Menu by clicking the 3 dots in the GREEN bar as shown in the previous slide.
This menu will allow you to Open Download Manager, Download folder link in .CSV, Check for changes made, View Archived Audits and Archive Safety File
Description of the three dots on the green main menu bar.
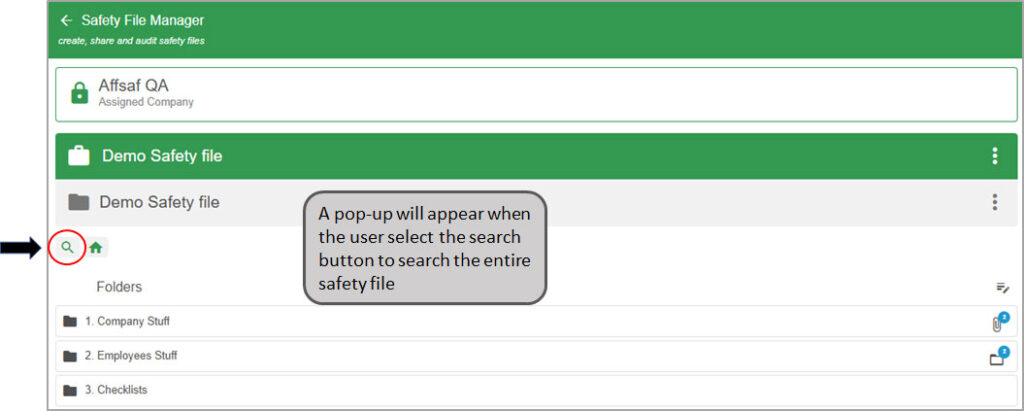
Safety File – Search Menu
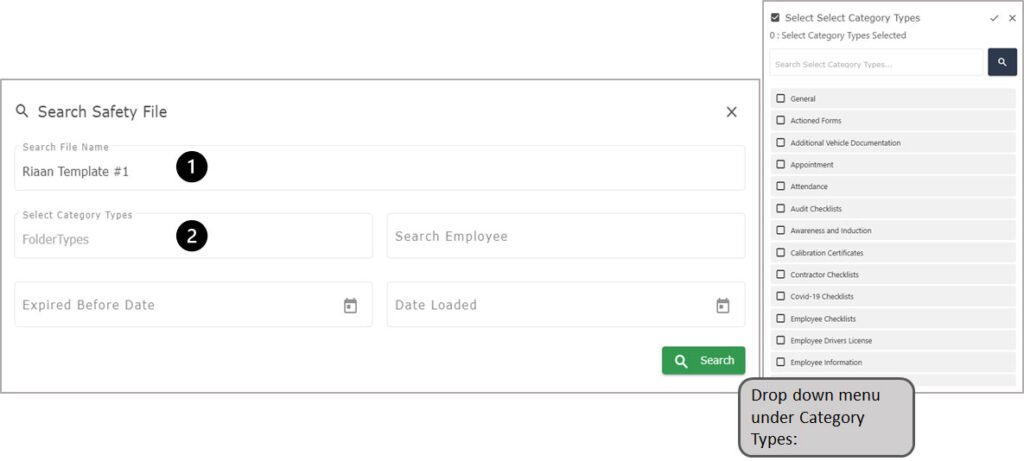
Populate the Search pop-up by completing at least one field.
From the drop down menu under Category types, there are various topics to choose from to make the search more specific.
Stage 2 - BUILD
This information guide will assist the user with managing, editing, populating an existing File. Existing files can be found under My Safety Files on the main Safety Files page.
Users can click on the CARD to open file Dashboard
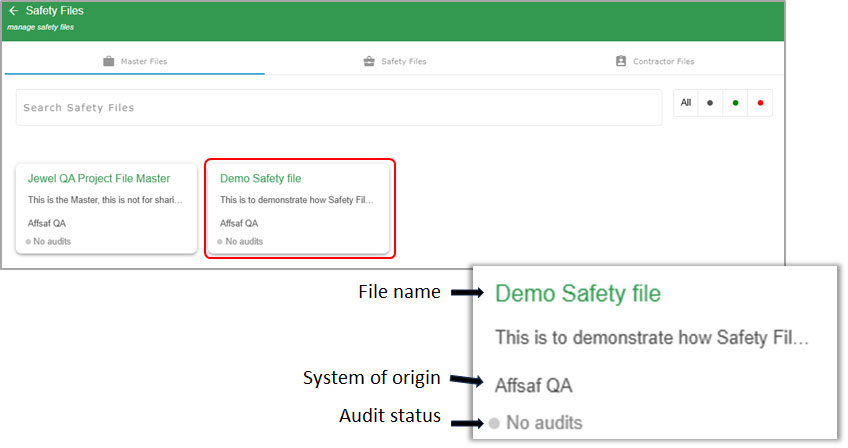
From here the user will see TABS for each of the 3 Safety File types (Master / Safety / Contractor) where they will see a CARD for each Safety File.
Stage 2 – BUILD – Safety file Dashboard
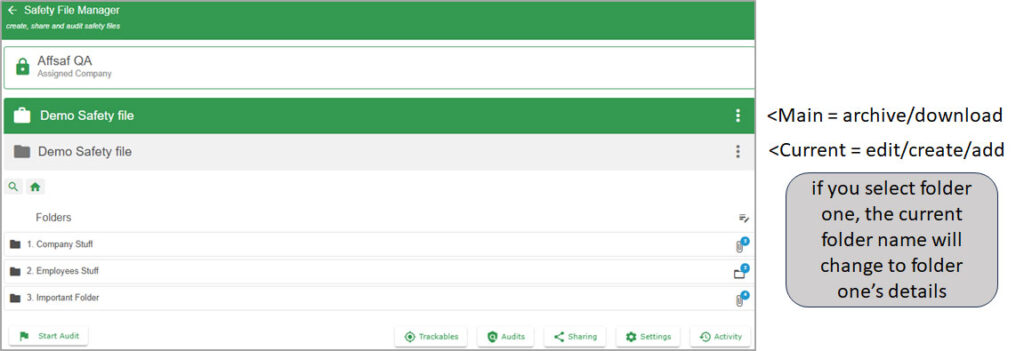
Upon opening the Safety File by clicking on the relevant card, the user is taken to the Safety File Dashboard where they can Manage, Edit, and Populate the Safety File. For our demo today we will be using the Master File type called: Demo Safety File.
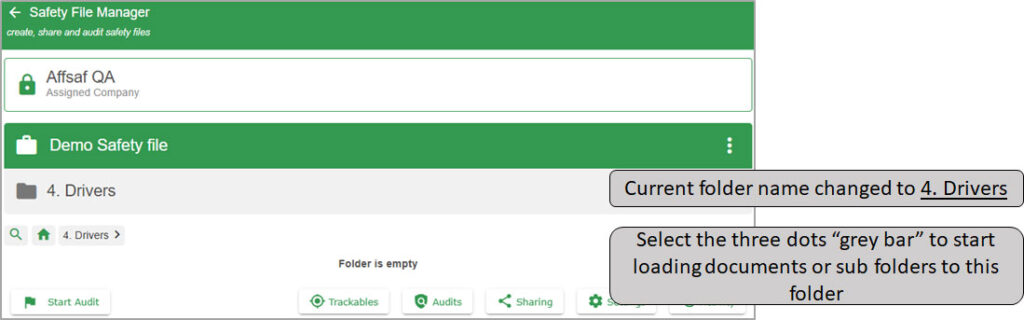
The Current folder (grey bar) will change depending on where you are, it will display current folder Name.
Changes and Updates made, selecting tabs from the menu will affect the current folder displayed on the grey bar.
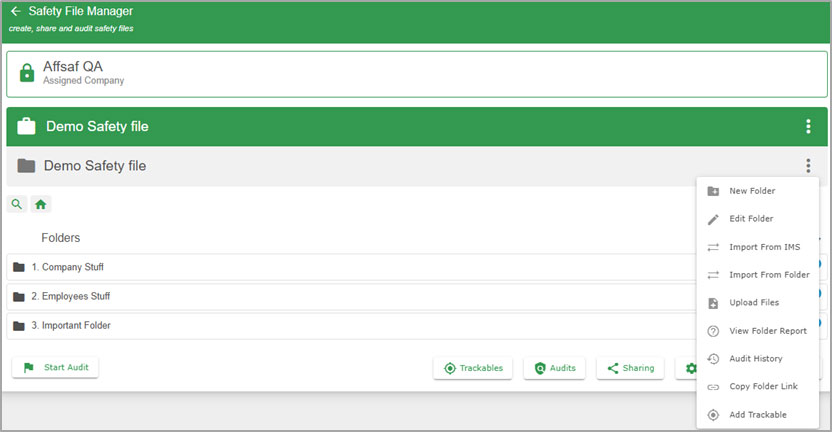
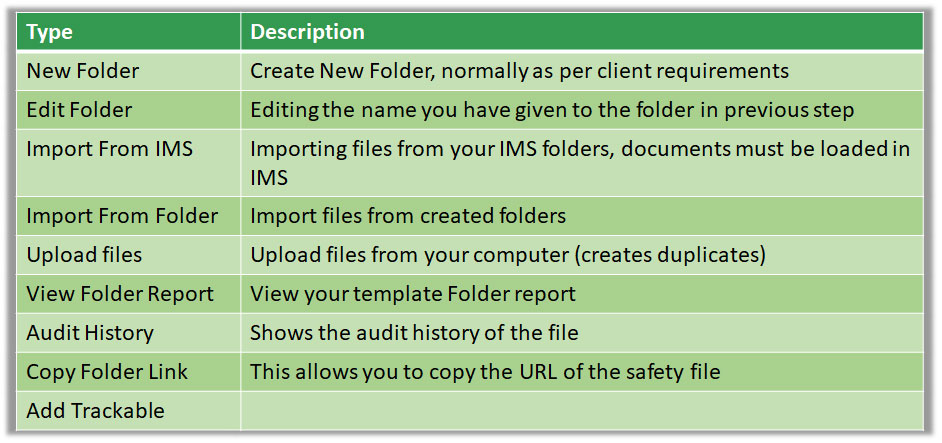
By clicking the 3 DOTS in the CURRENT FOLDER “Grey bar”, will open a dropdown.
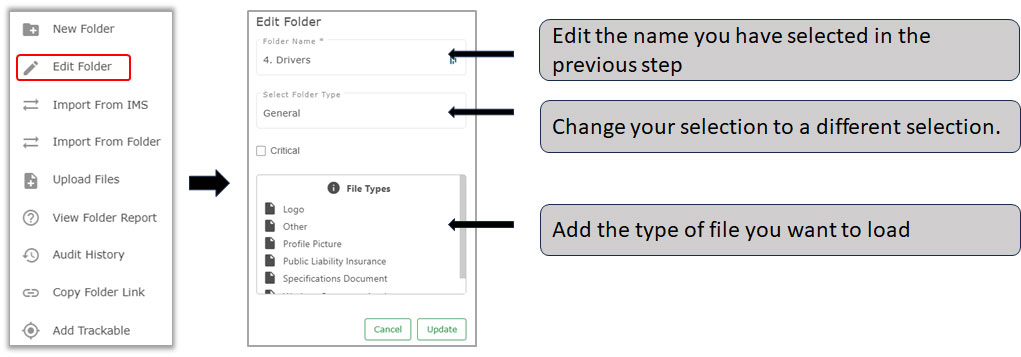
As default users should use the : General Folder Type.
When creating a New Folder the user will be tasked with entering Folder Name and Folder Type.
As default users should use the : General Folder Type.
Creating a new Folder, Clicking the 3 DOTS in the CURRENT FOLDER “Grey bar”, will open a dropdown, select “New Folder”. This will take you to the “Add Folder” card.
NB: Select Folder Type = We no longer recommend using the “General type” as default for loading documents. Monitoring of your safety file is only possible if documents are loaded correctly.
Creating a new Folder, Clicking the 3 DOTS in the CURRENT FOLDER “Grey bar”, will open a dropdown, select “New Folder”.
NB: Every time you use a different “Folder type ”. The fille type will change to list the corresponding available “File Types”.
NB: For monitoring of safety files, this needs to be in place. And the SOW as well.
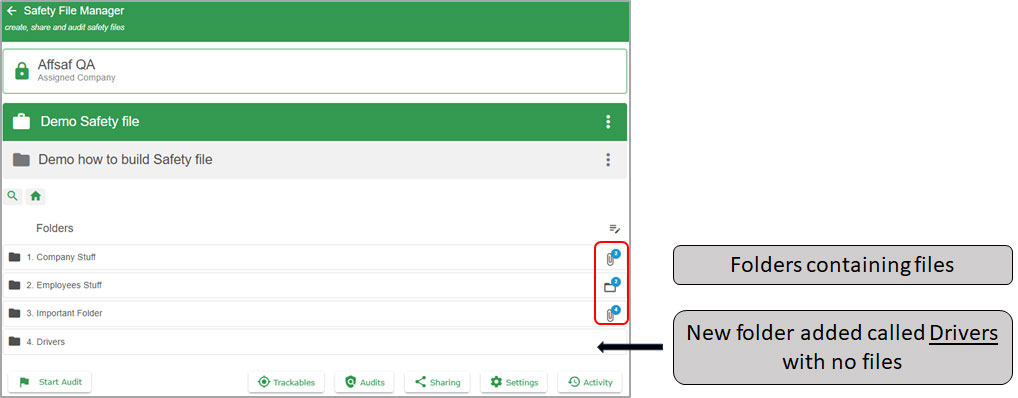
After the New Folder has been added, the dashboard will update to show New Folder and the user can click on the folder to open it up.
The user can then repeat the New Folder step to add a sub-folder and so on.
After the New Folder has been selected, the dashboard will update to show New Folder “4. Drivers”.
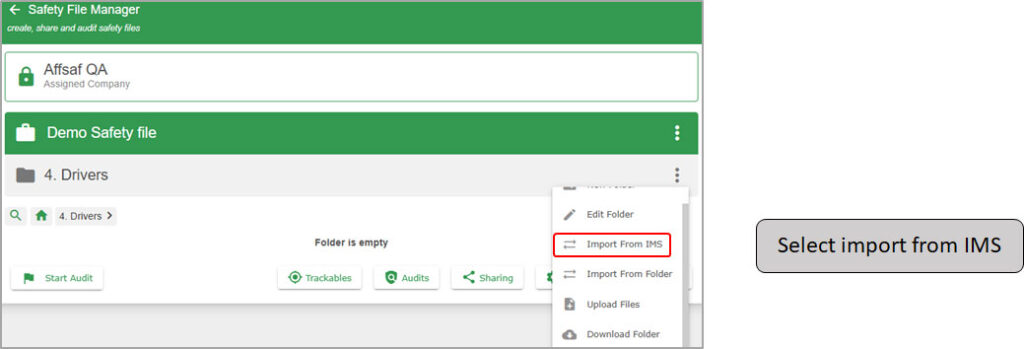
The user can also repeat the steps to add a sub-folders under Drivers or import documents.
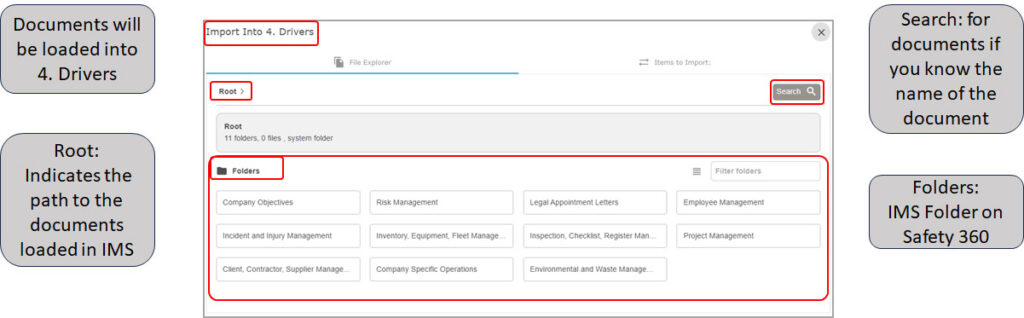
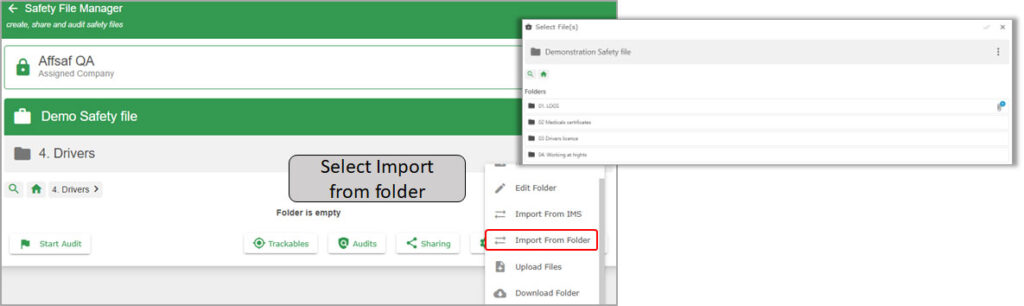
Select Import from IMS to start adding files.
The user will be taken to the IMS folder main page. Please review the File Manager guide on “IMS” for more details.
All the documents must be stored in the File Manager for easy sharing between several Safety files and when the file gets updated in the IMS then it will automatically update all the Safety files that contain this specific file (and the old one will stay in the safety file but shows archived).
Stage 2 – BUILD – Importing files from IMS
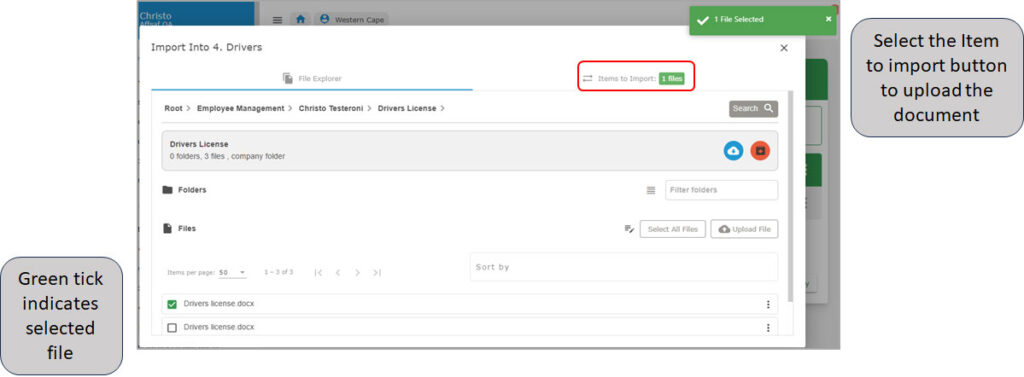
Once all the Folders and Sub-Folders have been created we can Populate the file with contents. These can either be documents already loaded to system (IMS).
*No duplicates can be imported from IMS, even in different folders/subfolders.
Importing Drivers license for Christo Testeroni from IMS.
*No duplicates can be imported from IMS, even in different folders/subfolders.
Import From IMS (Folder).
Users can also import entire sub-folders by clicking the box next to the folder. This will import ALL content included in the sub-folders.
Stage 2 – BUILD – Uploading files
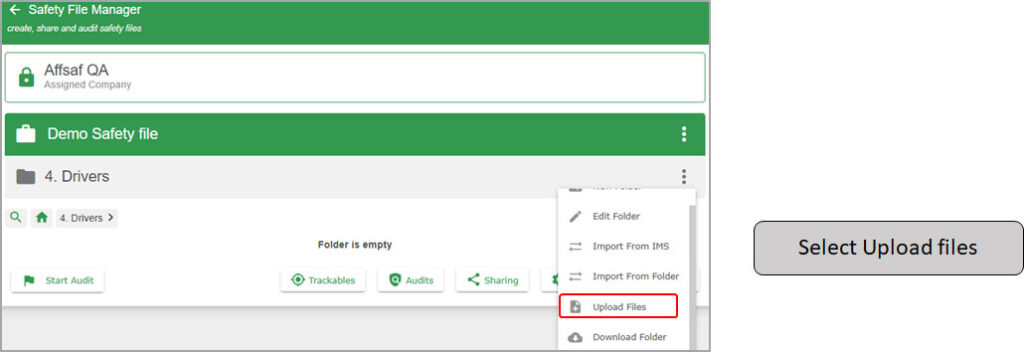
Import documents using the Upload files feature.
The user will be taken to the PC’s File Manager.
Kindly note that if a file is uploaded from the File Manager (IMS), then the system will populate it or update the file in the different safety files when the file is changed. For this process to automatically take place, the file must come from the IMS (Import from IMS) and not the user’s PC (Upload files). To get this correct, save the file in the File Manager (IMS) first and then link it to the Safety file or Safety files.
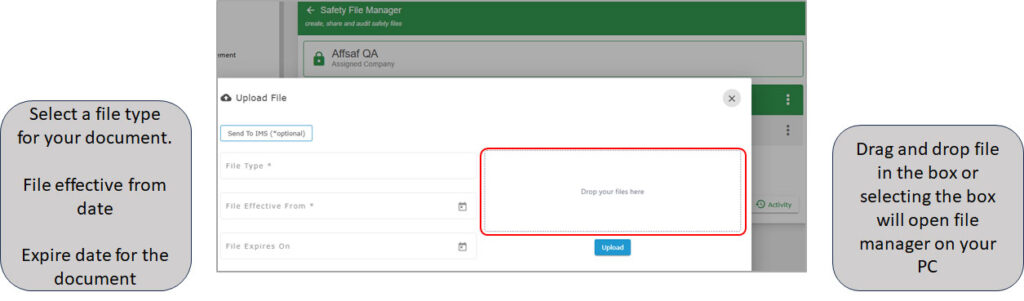
Selecting Upload file from the menu will open this page.
You can opt to also send the file to your IMS folder , tick the box Infront of the folder were you want to store the document.
If you upload the file without selecting to store it in IMS it will only be visible in this safety file.
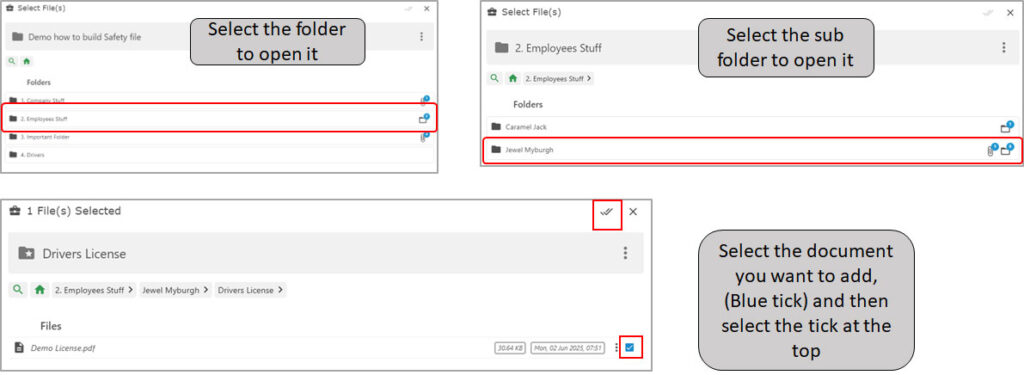
Import documents to my folder from the same Safety File. It stores a duplicate of the same document.
The user will be taken to the “Select File” page. The user can select files from other folders to load into the current folder. Documents are duplicated. Example medicals can be loaded in WAH folder and Electrical.
This action opens your current Safety file folders, select the folder you want to open.
The document will be loaded to your, current folder.
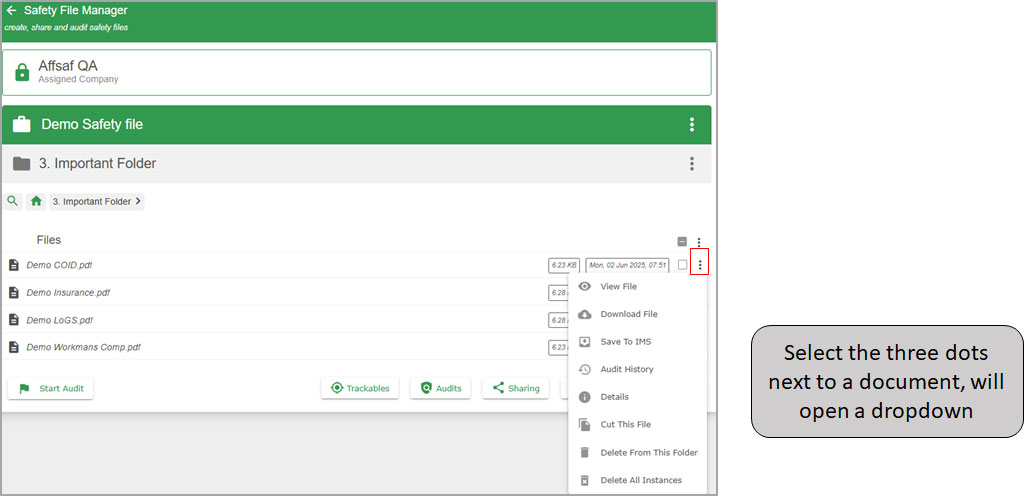
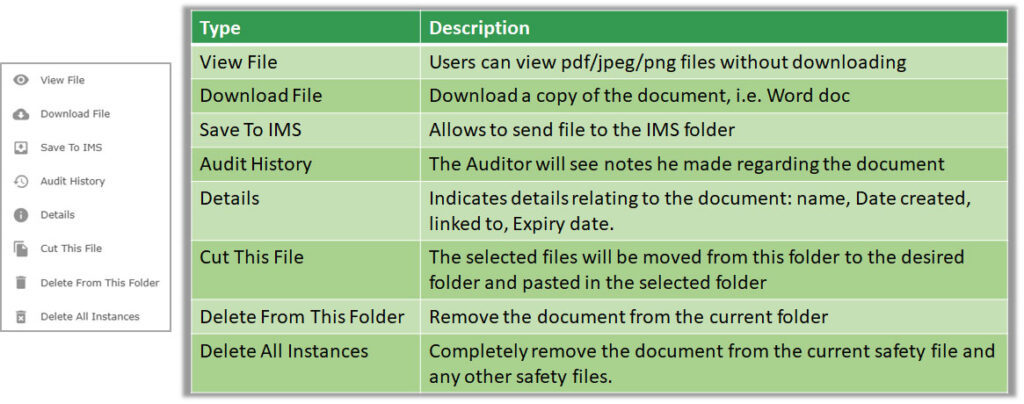
Reviewing documents loaded in your Safety file.
By clicking the 3 DOTS next to the document it will open a dropdown menu.
The population and content of Files can be continually monitored and managed through My Safety Files.
Stage 3 - Verification
This information guide will assist the user with Auditing or Verifying a File and its contents. Once all folders/subfolders have been created and all documents have been loaded either via Import from IMS or Upload Files, the user can proceeded to Verification phase (optional).
This phase can include Internal:
Sharing (within your company) and Auditing, either done by you or anyone from your company.
If the user is ready to start an audit, they can click the Start Audit button in the bottom left of the main file dashboard (Internal Audit).
Stage 3 - Verification - Auditing folders
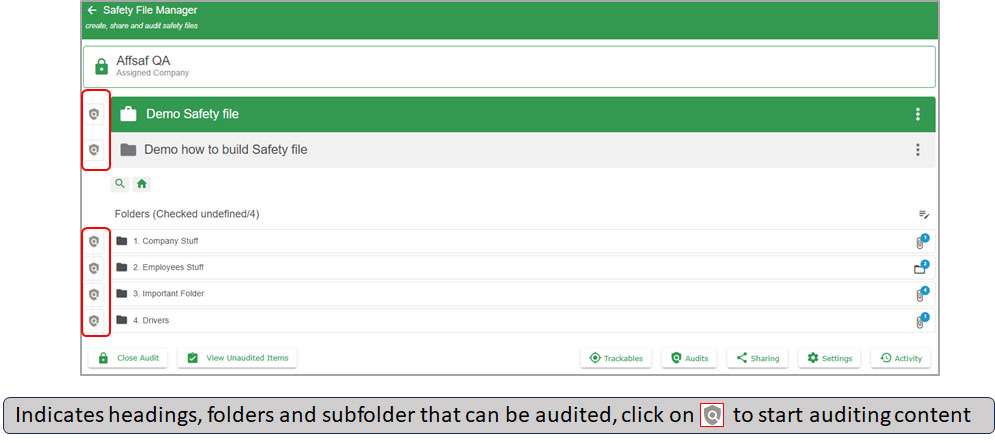
Selecting the start Audit opens a dropdown were you are required to select the region, inspection area, and expire date of the Audit. The next step will open the Audit screen, all headings, folders, and subfolders will be auditable.
Stage 3 - Verification - Audits
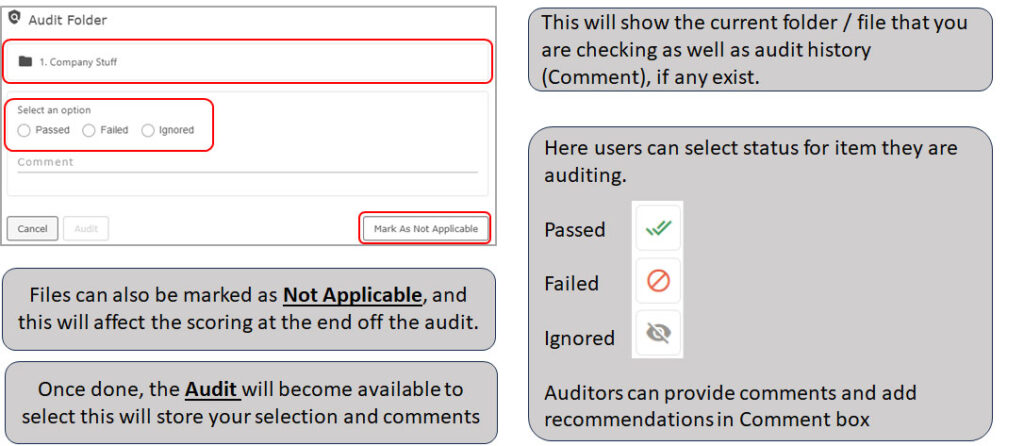
This icon will be present on ALL folders / sub-folders / document. Clicking the Audit Icon will open the Audit selector:
Through Auditing each folder / sub-folder and each file, the auditor is building both a roadmap for themselves as well as action plan for auditee to correct.
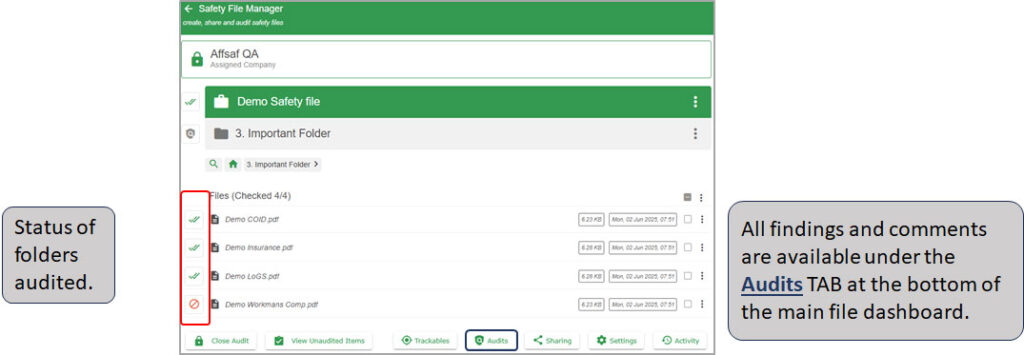
The primary goal of Safety 360 Elite, Safety File Auditor is to ensure there is a audit status for EVERY FOLDERS & SUB FOLDER AS WELL AS EVERY DOCUMENT.
Once the self assessment audit is complete, the file can be shared internally or sent to non-system users via external sharing.
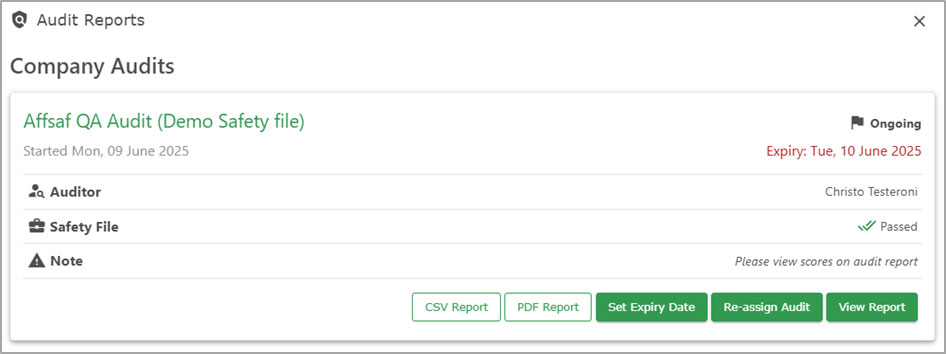
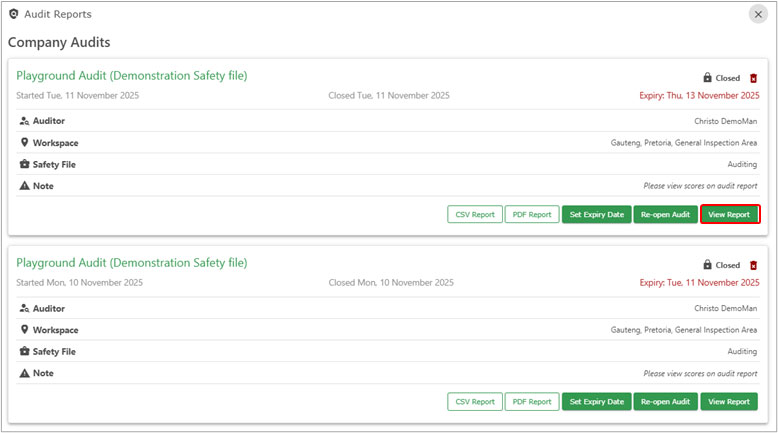
Audits can also be Re-assigned internally, meaning one user can send the audit to another users profile. Users can also export audit report data to CSV or PDF.
Stage 3 - Verification - Audit Report
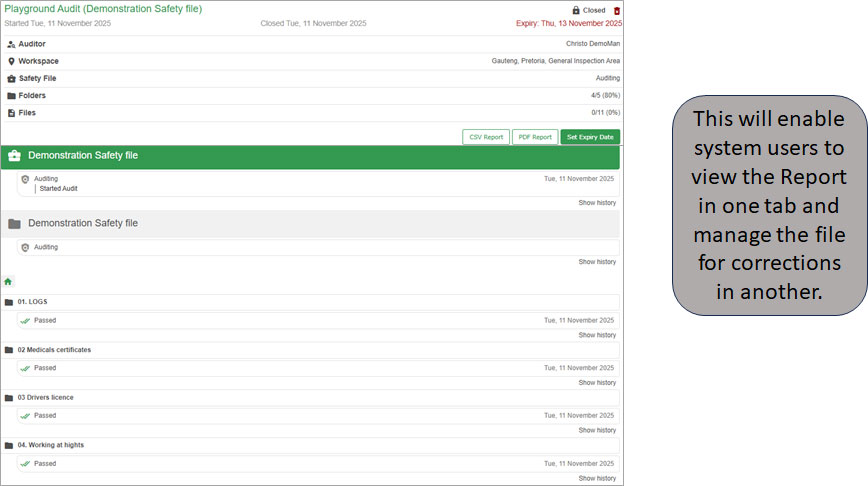
The Audit Report itself will open in a new tab in your browser. This will enable system users to view the Report in one tab and manage the file for corrections in another.
The Audit Report itself will open in a new tab in your browser.
Stage 4 - Sharing
This information guide will assist the user with sharing Files both Externally and internally. There is a separate manual for External sharing for more details. All File types on the Safety 360 Elite Safety File feature are built around security and data integrity.
By default only the creator of a file can access it through My Safety Files. To all other users, including Control users, it will be hidden until permission to view/manage/edit has been given.
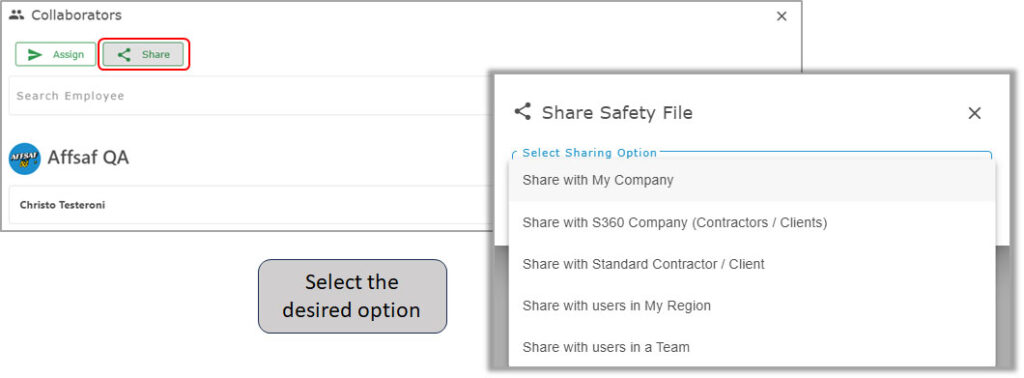
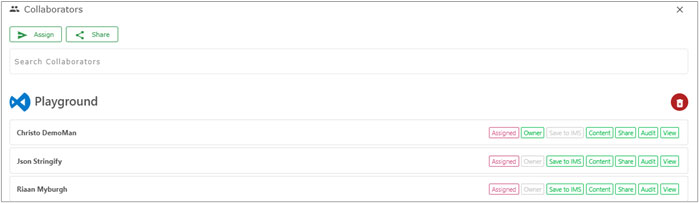
Clicking the Sharing icon will open Safety File Collaborators list. These are people who have access to this file.
There are 5 types of sharing: Users from your Organisation, S360 COMPANY (Contractors and Clients), and STANDARD (via email),You can share within different regions of your company, or specific users in a team.
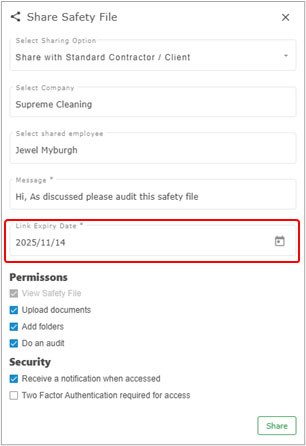
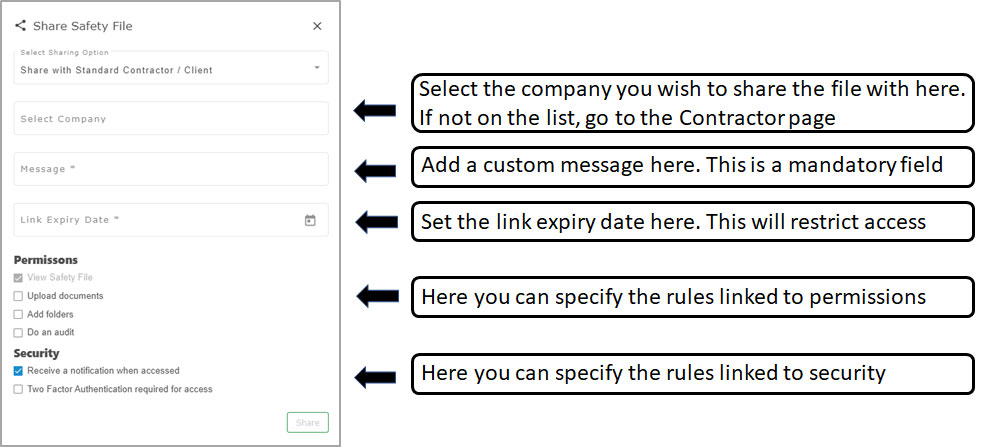
Selecting the share button you will need to complete the details of the receiving party.
– Users can select companies that have their own system, as well as specific users. – There is a mandatory Message box to give instructions. – These are followed by permissions that must be given to allow certain actions.
– Same as the S360 Company adding, the only difference being the user must set a expiry date for access to the file. – Recipients of these files cannot share them with other persons/company’s. – You can also tick the box to receive notifications when your safety file is opened by the 3rd party.
Sharing a Contractor File (see separate manual for more details - Safety Files External)
From there we are taken to the Share page. Here you will add all the required details regarding sharing.
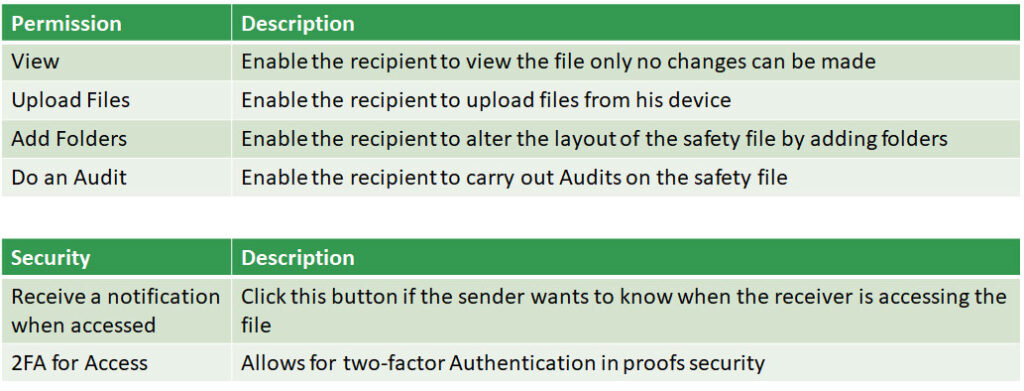
Contractor File – Sharing - Permissions
The relevant permissions and Security are explained below:
Very important to remember that safety files are not accessible by anyone!
By default, only the creator of a file will have access. They must first share the file with other users (internally or externally) to gain access. The Collaborators list (under the Sharing TAB) will show everyone who has access.
If a users name appears on this list, they will have access (in one way or another based on permission). Only the Assigned company will be able to work on the Safety file.
If their name is not on the list, they wont have access. User access can be revoked by Creator by clicking on user entry and selecting REVOKE, there is also a bulk REVOKE option.
If the person you are sharing with has a Safety 360 Elite login, use INTERNAL SHARING. If the person you are sharing the file with does not have a Safety 360 Elite login, use EXTERNAL SHARING
Once a file has been shared, it has been shared. Sharing happens only once, from there, files follow the Assign VS Return process.
There are some statuses that can be assigned to Files shared both INTERNALLY and EXTERNALLY.
If the person you are sharing with, has a Safety 360 Elite login, use INTERNAL SHARING.
If the person you are sharing the file with does not have a Safety 360 Elite login, use EXTERNAL SHARING.
Stage 4 – Files Shared to You
Files that have been shared INTERNALLY or EXTERNELAY are available under the SHARED SAFETY FILE tab on the main Safety File home screen.
Select Share Safety files to open all files Shared with you.
New Safety File – Archive Safety File
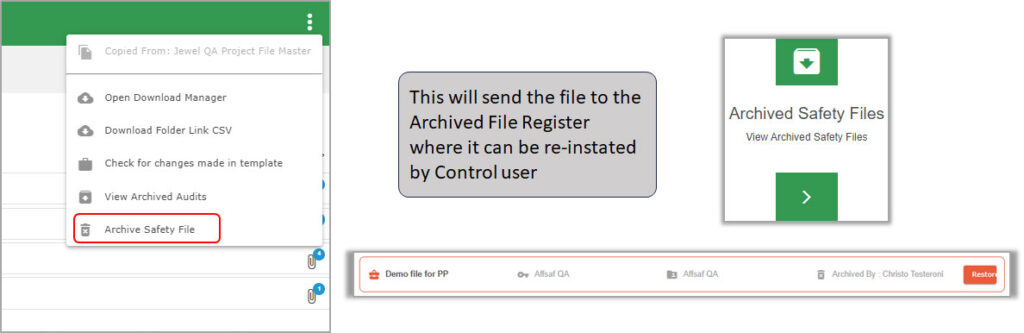
Files that have been created by mistake or are no longer going to be used can be Archived on the Main Safety File Dashboard, under the Main Folder bar (Green Bar), by clicking the 3 dots and selecting: Archive Safety File.
Archive means no longer visible in day to day folders but can be viewed and reinstated.
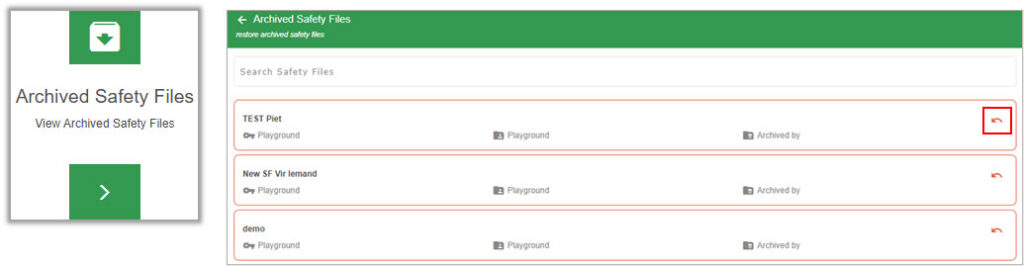
Selecting the Archived Safety Files on the Main Safety File Dashboard, will open all the Archived Safety File.
Archive means no longer visible in day to day folders but can be viewed and reinstated. Controle users can reinstate the file by selecting the line item and clicking on the red return arrow.
Safety File - Reports
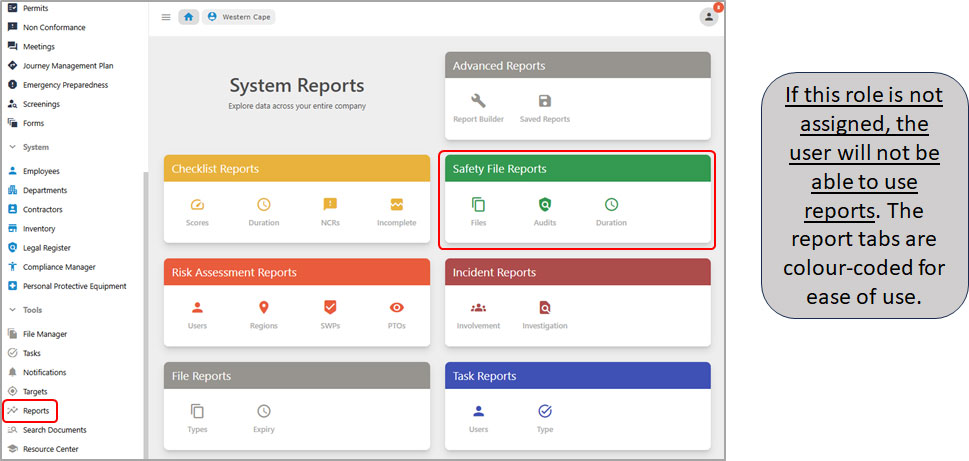
Under the Left Navigation Pane, there is a feature called Reports. Clicking the icon will open the Reports page if the user has the correct HSE role Reports Controller.
There are currently 3 types of Safety File Reports available on Safety 360 Elite:
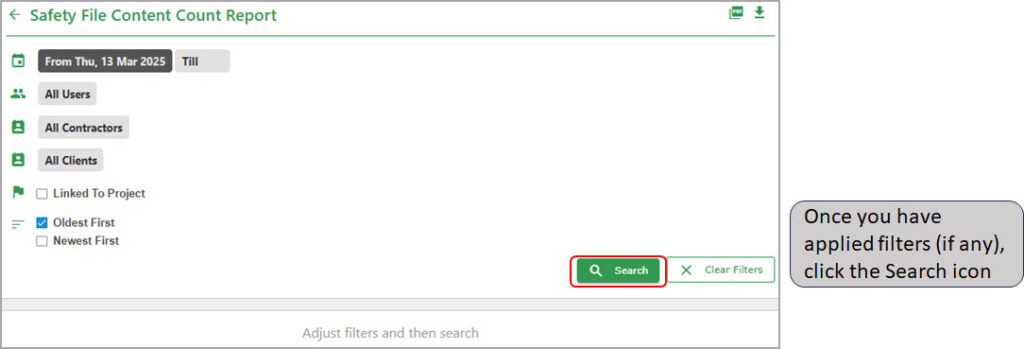
Files : Reports on Number of files per safety file
Audits : Reports on File Audit Scores per Safety File
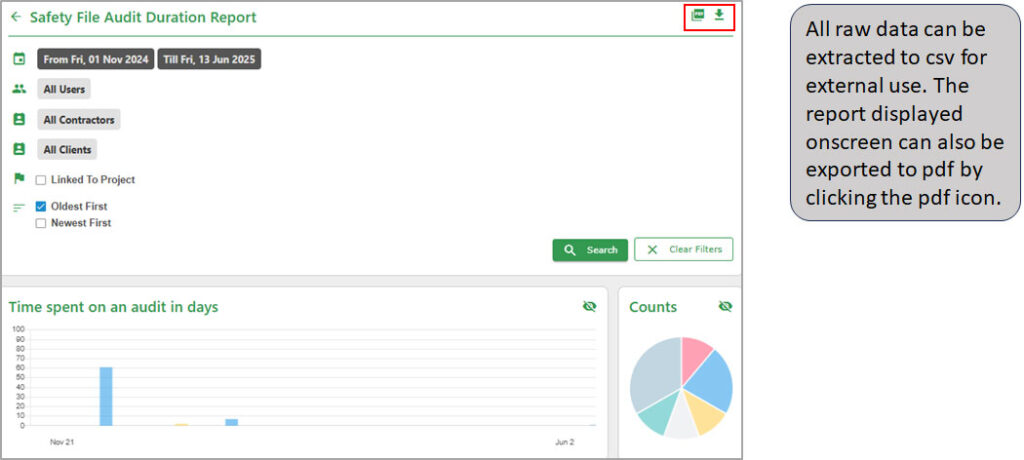
Duration : Reports on Time spent on Audits in days
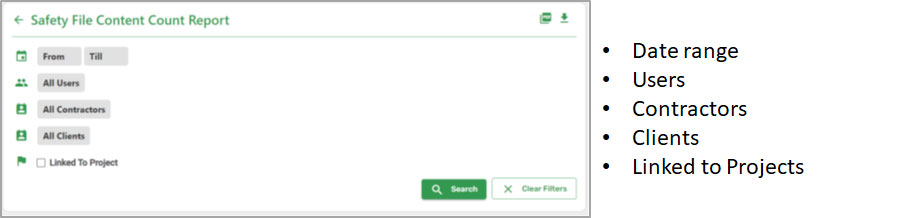
These reports also include all the normal Reports filters that can be applied as needed:
By making use of the Safety 360 Elite Reports we can pull data for Files, Audits and Durations. Here users would apply the required filters (Date / users / regions / statuses / times).
Now the user will be show all the data that has passed through the filters.
Rules to Remember
PLEASE ENSURE, WHERE POSSIBLE, DOCUMENTS ARE LOADED TO SAFETY 360 ELITE FILE EXPLORER (IMS) AND IMPORTED FROM THE IMS TO AVOID DUPLICATES.
Using the Upload Files process should only be, for file-specific documents (drawings/Charts), meaning they won’t be used anywhere else ever again….once and done.
By using the File Explorer we can ensure all documents can be managed in one place to avoid duplication and confusion. This will also remind control users of expiring files that require attention.
More Rules to Remember when dealing with Files (Master / Safety / Contractor)
Access to files must be given via sharing.
Assigning Safety file gives control to the assignee
Only Master files can be copied.
Master files cannot be shared externally.
The preferred choice for file population is IMPORT FROM THE IMS.
Ensure Connected Companies and Shared Employees are set-up to enable SHARING of Safety Files
Only the assigned parties can make changes or audit file (if assigned role is not with you, you can only view)
Only 1 assigned party at a time, check-in / check-out
NO DUPLICATES on import of files or folders in a file, even if they are in other folders.
The user will SHARE a safety file once, thereafter it needs to be assigned for the other person to action
Conclusion
Safety Files aims to assist system users with creating, maintaining and sharing safety files digitally.
Contractor files can be used to onboard suppliers and ensure compliance through auditing.
All data can be downloaded for easy external use and can be reported on through Safety 360 Elite Reports.